
by Norman Nock
Originally published in the Austin-Healey Magazine, January 1987

The Laycock de Normanville overdrive which is fitted to most Austin-Healeys is an extension on the end of the transmission that allows higher gear ratios to be transferred to the wheels. In effect, it drives the wheels at a speed over that of the engine, which explains the name "overdrive." Many people believe that because the overdrive is activated by an electrical switch on the fascia, that it is electric. In truth, the overdrive is put into operation by an electric solenoid switch, but the actual operation of the overdrive is hydraulic. Unlike the brake and clutch hydraulic systems which have separate closed fluid systems, the Laycock de Normanville overdrive shares lubricating oil with the transmission. For this reason it is absolutely mandatory that heavy oil, such as 90-weight gear oil, NEVER be used in an Austin Healey transmission fitted with an overdrive unit.
The internal working parts of all hydraulic equipment must be kept in an absolutely clean condition. The gearbox oil must be changed every 6000 miles; if not, sludge and fine particles of metal will find their way into the hydraulic working system of the overdrive. To change the gearbox oil, drain the gearbox and remove the large brass plug at the bottom of the overdrive. Inside the cup of the brass drain plug there should be round magnets. Remove them and wipe them clean. Then look into the hole from where the brass plug was removed, and you will see a filter. Remove, clean and replace the filter. If there are no round magnets inside the drain plug, you should do your best to locate some. Drivers who grind gears going into first and reverse are wearing away the metal of those gears, and this metal finds its way into the overdrive. The filter and magnets will hold some of it and keep it from causing further damage. However, fast changing into other gears will wear away the synchronizer rings, and since those rings are made of brass (which is not magnetic), tiny bits worn off will bypass the magnets and remain suspended in the oil in the overdrive and gearbox units causing further wear on the internal components of those units.
Prevention is always the best policy, so change the oil regularly, do not grind gears when shifting into first and reverse, and do not overwork the synchronizers with fast gear changes. Also very important, do not use 90-weight oil or products like "Slik 50" in your overdrive. Use only engine oil, 30 to 50-weight.
If overdrive does not engage
Make sure that the overdrive unit has the correct type oil in it, and check to ensure that it's filled up to the full mark on the dip stick. Next, check to ensure that electricity is reaching the overdrive solenoid. The best way to check this is to turn on the ignition switch (without starting the engine) and place the overdrive switch in the on ("overdrive") position. Make sure you have the accelerator pedal all the way to the floor, and then move the gearshift lever from left to right. Each time you move it to the right (towards third and fourth gears) you should hear a "click." If there is no click, remove one wire from the accelerator linkage switch on the firewall and try again. If you still have no click, you most likely have a fault in your overdrive electrical circuit.
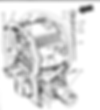
If the electric operation is making the overdrive solenoid click, and you still have an overdrive that does not engage, remove the transmission tunnel from the car's interior. The overdrive unit is the rearward two sections behind the gearbox. The section with the large brass plug in the bottom is the only one we will be concerned with in this report.
The cylindrical solenoid on the left side of the case-the one with the wire going to it-is the main operating solenoid. Disconnect the wire from the snap connector and connect a hot wire from the main battery feed to the wire that goes to the solenoid. If the solenoid does not make a sound when connected, you have a faulty solenoid. If the solenoid makes a strong clunk, you should recheck that the electrical circuit is working correctly. If the solenoid makes a clunk and the electrical circuits all test out as OK, check the hydraulic system.

Checking the Hydraulic System
Checking the hydraulic system is easy. On the right side of the overdrive case there is a small lever used for selling and adjusting the overdrive solenoid (see illustration). Holding this lever with your thumb and index finger, you should be able to push the lever down lightly about 3/8" until you feel a slight spring resistance. The lever should go down another 1/4" after encountering the resistance. This last 1/4" of travel that the solenoid lever makes will release the hydraulic pressure inside the overdrive to activate the gears that effect the change into a higher ratio.
Now go drive the car and check the operation during the road test. Manually press down on the lever while in third or fourth gear. DO NOT BACK THE CAR WHILE THE LEVER IS DEPRESSEDAS IT WILL CAUSE DAMAGE TO THE INTERNAL COMPONENTS OF THE OVERDRIVE UNIT. (You can also conduct this test with the car on jack stands.) If your overdrive works when you push down on the lever, then your problem is usually a faulty adjustment of the solenoid operating linkage.
Adjusting the Solenoid lever
Many problems are caused by the solenoid not being properly adjusted. To adjust the solenoid lever, remove the cover from the left side of the overdrive and loosen the nut (see "A" in illustration) so that the arm (C) is loose on the spindle (B). Using a 3/16" drill bit, push the shank through the hole on the lever located on the other side of the overdrive unit and engage it into the 3/16" hole located in the aluminum housing locking the arm into a set position. Energize the solenoid with a wire from the main battery feed through a 0-30 amp ammeter. The solenoid should make a strong "click" sound. As it pulls its armature into itself, the ammeter should jump and then settle down to 1-1/2 amps. If it reads 15-20 amps, the solenoid will burn itself out.
With the solenoid energized, tighten the nut (A), locking the shaft (B) to the arm(C). Inspect the arm very closely at point D. The arm must touch the bottom of the actuating flare of the armature (when the solenoid is engaged). If this part of the adjustment procedure is not done properly, you are wasting your time because the overdrive will not work! Ifyour overdrive still does not work, youhave an internal problem and the next step would be checking the operating pressure.
Checking Operating Pressure
Check the operating pressure by removing the 1/4BS - 3/16W plug from the top right side of the overdrive unit (see illustration). If oil starts to come out from the side of the plug, there could be pressure inside the unit. Operate the lever on the right side to release the internal pressure. Then carefully remove the plug. If the drive shaft is turned by rotating a rear wheel while simultaneously holding the other rear wheel stationary, you should get a small pulsation of oil from the plug hole. This indicates that the pump is working. Taking an accurate pressure reading can only be done with the correct adaptor and a 0-800 Ibs/in gauge. Reference the factory service manuals for the correct procedure or take it to a shop which has the proper equipment. The working pressure for the BN 1 should be 450-500Ibs/in, and for all other Big Healeys, 400-450 Ibs/in.
Overdrive Stays Engaged

DO NOT BACK UP IF YOUR OVERDRIVE WILL NOT DISENGAGE! When the overdrive is activated, an overrunning clutch prevents the driveshaft from reversing. If the drive shaft is forced in the reverse direction, something will break, and it will probably be very expensive. To correct this problem you will need to check the operating valve and ensure that it is not restricted by a foreign matter. To gain access to the operating valve, remove the 1/4BSo3/16W plug from the top right side of the overdrive unit (see "A" in illustration). Next, remove the spring (B), the plunger (C), the ball (D), and finally the valve (J). This can be removed by lifting the small lever you used when testing the overdrive and a magnet to lift out the hollow spindle in the hole with a conical seating (G). The restrictor valve aperture (H) is a very small hole and if any foreign objects get into the top of the hollow shaft, the oil pressure will push them down the shaft. If it blocks this aperture you will have problems such as no disengagement, clutch slipping in reverse, and freewheeling conditions on overrun. The release of oil pressure is restricted by this small hole for a half second to make a for smooth change from overdrive to standard drive.
I know of a club member who had the problem of the overdrive refusing to disengage after the overdrive was switched off. He said that he developed the problem after rebuilding his transmission. The odd part of the story is that the overdrive would not disengage right away, but would disengage a few minutes after it had been switched off. As it turned out, the problem was caused by a particle of sand which had found its way into the operating valve.
Final Thoughts
The handbook for the overdrive says that the clutch should not be used to change into or out of overdrive. Also, to quote from the service manual of Laycock Engineering, Ltd., "Use only oil, preferably a straight mineral oil, with a viscosity between SAE 30 and SAE 50, with no E.P. additives and on no account should any anti-friction additives be put into the oil." Most internal problems are caused by dirt, metal particles, or 90-weight differential oil being put into the overdrive.
Not what you were looking for? Don't forget you can check our back issues using the AHCUSA Magazine Index.